Automating Amazon Elastic Container (ECR) container builds using Bitbucket Pipelines

Bitbucket Pipelines has fascinated me for several weeks now. I’ve already explored using it for Serverless deployments, and I recently spent some time exploring it for container deployments.
In this post, we continue our exploration further. The plan is to build a container and push it to a container registry, all from within Bitbucket Pipelines.
The method works for any container registry that understands docker commands, but today we use AWS Elastic Compute Registry as our target.
What is AWS Elastic Container Registry?
AWS Elastic Container Registry, or ECR, is a fully-managed container registry service provided by AWS. Think Docker Hub on the AWS platform. It integrates well with existing AWS services, such as ECS (Elastic Container Service) and IAM (Identity and Access Management), to provide a secure and straightforward way to manage and deploy container images in your AWS environment.
A quick overview of ECR’s features:
- Container images are stored in S3, encrypted at rest, and transferred to and from ECR over HTTPS.
- Supports Docker Image Manifest V2 and OCI images.
- Existing
dockercommand-line tools work with ECR. - It supports expiring unused images via lifecycle policies.
- Supports resource tags, making governance and cost analysis easier.
- Repository tags can be mutable (tags are overwritable) or immutable (tags are not overwritable).
Goal: Build a Docker image and push it to ECR using Bitbucket Pipelines
To build and push our Docker image to ECR, we’re going to need the following:
- A Dockerfile for building the image.
- An ECR repository for our Docker images.
- An IAM user with a policy to push our image to ECR.
- A Bitbucket Pipeline to run all the above steps.
So let’s get started.
Step 1: Creating a Docker image
For this exercise, we’re going to be deploying a simple Apache web server container.
Create a Dockerfile and add the following contents:
FROM ubuntu:18.04
# Install dependencies
RUN apt-get update && \
apt-get -y install apache2
# Install apache and write hello world message
RUN echo 'Hello World!' > /var/www/html/index.html
# Configure apache
RUN echo '#!/bin/bash' > /root/run_apache.sh
RUN echo '. /etc/apache2/envvars' >> /root/run_apache.sh && \
echo 'mkdir -p /var/run/apache2' >> /root/run_apache.sh && \
echo 'mkdir -p /var/lock/apache2' >> /root/run_apache.sh && \
echo '/usr/sbin/apache2 -D FOREGROUND' >> /root/run_apache.sh && \
echo 'localhost' > /etc/hostname && \
chmod 755 /root/run_apache.sh
EXPOSE 80
ENTRYPOINT ["/root/run_apache.sh"]
Let’s build the above Dockerfile using:
docker build -t my-apache-image:my-tag . --network host
A successful build log looks like this (some lines removed):
...
Step 3/7 : RUN echo 'Hello World!' > /var/www/html/index.html
 ---> Running in 908ad0bee81a
Removing intermediate container 908ad0bee81a
 ---> 30b2e3dcd394
Step 4/7 : RUN echo '#!/bin/bash' > /root/run_apache.sh
 ---> Running in aec34d2fe7a4
Removing intermediate container aec34d2fe7a4
 ---> ddf05a9b474f
Step 5/7 : RUN echo '. /etc/apache2/envvars' >> /root/run_apache.sh && echo 'mkdir -p /var/run/apache2' >> /root/run_apache.sh && echo 'mkdir -p /var/lock/apache2' >> /root/run_apache.sh && echo '/usr/sbin/apache2 -D FOREGROUND' >> /root/run_apache.sh && echo 'localhost' > /etc/hostname && chmod 755 /root/run_apache.sh
 ---> Running in b6a7069cee6d
Removing intermediate container b6a7069cee6d
 ---> 13eaea68825d
Step 6/7 : EXPOSE 80
 ---> Running in 1f5ebfc89616
Removing intermediate container 1f5ebfc89616
 ---> 541cb3a1728f
Step 7/7 : ENTRYPOINT ["/root/run_apache.sh"]
 ---> Running in b437bf63d423
Removing intermediate container b437bf63d423
 ---> c80bea22e854
Successfully built c80bea22e854
Successfully tagged my-apache-image:my-tag
To test the image, run the above container using:
docker run -p 80:80 my-apache-image:my-tag
Let’s check whether Apache is working:
curl http://localhost
Hello World!
Step 2: Creating a ECR repository
With our Dockerfile ready and tested, we’re ready to create our ECR repository.
Head over to AWS ECR and create a new repo. The process is pretty simple: pick a repo name and select the tag immutability preference. I’m going to name my repo ayush-sharma-testing.
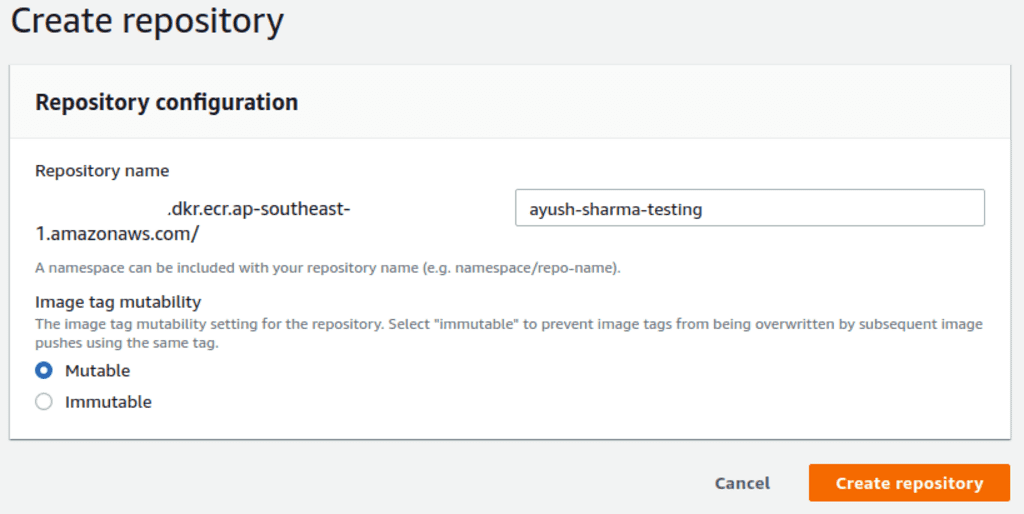
For tag immutability, we have two options: mutable or immutable. Mutable tags are overwritable by future builds, but immutable tags are not. For example, a mutable repo allows re-deploying tags like release-v1.0.0 or latest, but an immutable repo will throw an error when doing so. For this exercise, I’ll go with mutable tags.
Step 3: Creating an IAM user with an ECR policy
Our Bitbucket repo needs AWS IAM user credentials to push the images to ECR.
For IAM permissions, we’re going to pick the AmazonEC2ContainerRegistryPowerUser managed policy. This will give our Pipeline the basic access it needs to push images to the repository.
The policy document is as follows:
{
    "Version": "2012-10-17",
    "Statement": [
        {
            "Effect": "Allow",
            "Action": [
                "ecr:GetAuthorizationToken",
                "ecr:BatchCheckLayerAvailability",
                "ecr:GetDownloadUrlForLayer",
                "ecr:GetRepositoryPolicy",
                "ecr:DescribeRepositories",
                "ecr:ListImages",
                "ecr:DescribeImages",
                "ecr:BatchGetImage",
                "ecr:InitiateLayerUpload",
                "ecr:UploadLayerPart",
                "ecr:CompleteLayerUpload",
                "ecr:PutImage"
            ],
            "Resource": "*"
        }
    ]
}
You can refer to the steps we used in the Bitbucket Pipes tutorial to create an IAM user.
For the IAM user created above, generate an access-ID/secret-key pair for the user. Add the credentials to the Bitbucket repository variables. Use the names AWS_KEY for the key and AWS_SECRET for the secret. Remember to obscure the values when you save them!
It’s essential to follow the least-privilege principle while creating this IAM user. Keep the policy as tight as possible, since we want to re-use it in many deployments. Consider limiting the region of the ECR in the Resource section.
Step 4: Create our Pipelines file
Now create a bitbucket-pipelines.yml file and add the following:
image: python:3.7.4-alpine3.10

pipelines:
  tags:
    ecr-release-*:
      - step:
          services:
            - docker
          caches:
            - pip
          script:
            - pip3 install awscli
            - IMAGE="<image_uri>/ayush-sharma-testing"
            - TAG=${BITBUCKET_BRANCH:-$BITBUCKET_TAG}
            - aws configure set aws_access_key_id "${AWS_KEY}"
            - aws configure set aws_secret_access_key "${AWS_SECRET}"
            - eval $(aws ecr get-login --no-include-email --region ap-southeast-1 | sed 's;https://;;g')
            - docker build -t $IMAGE:$TAG .
            - docker push $IMAGE:$TAG
There are a few things going on in the pipelines file above:
- We’re using the
python:3.7.4-alpine3.10Docker image in our pipeline. This Alpine-based image loads quickly and haspip3already installed. ecr-release-*is our tag regex, so when we create a Bitbucket tag with this pattern, our Pipeline executes for that tag.services: dockerenables Docker commands within Pipelines.caches: pipstep caches all the pip dependencies for later use.IMAGEis the URI of our ECR repo on AWS. Replace<image_uri>with your repo URI, which you can get from your ECR.
Step 5: Executing our deployment
With everything set, we’re now ready to test our deployment. To do this, commit and push the Dockerfile and bitbucket-pipelines.yml files we created above, and create a tag in the format ecr-release-*.
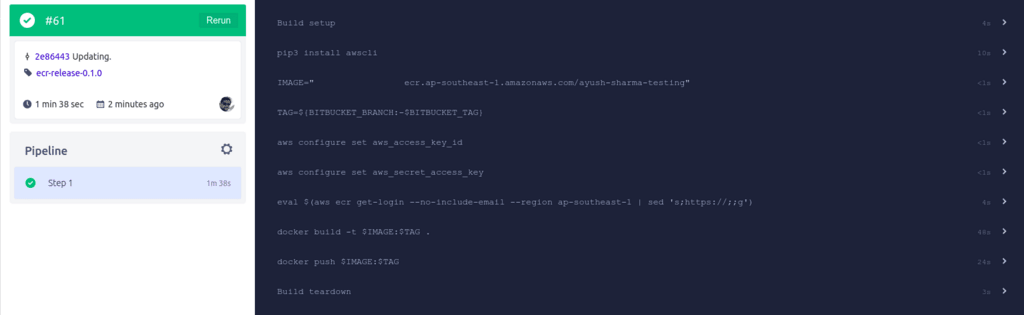
In my example Bitbucket repo, when I create a tag ecr-release-0.1.0, my Pipelines log looks like this:
Heading over to my ECR repo, I can see my new image tagged with my Bitbucket release tag:

ECR considerations for production use
ECR treats image tags in two different ways: mutable and immutable. Mutable tags are overwritable, which allows creating the latest tag repeatedly, pointing it to the latest image. However, this also means that older tags, such as ecr-release-0.1.0, can also be overwritten by re-running those older Pipelines. Immutable ECR repos ensure tags, once created, cannot be modified, but this means that the technique of tagging latest images with the latest tag no longer work. This trade-off is essential to consider and plan for before deploying ECR in production.
Additionally, like other AWS services, ECR is available in multiple AWS regions. Since the purpose of a repository is to be a single source of truth for all images, having ECR repositories in multiple regions should be carefully considered. AWS currently does not support automatic inter-region repo mirroring for disaster recovery. So have a plan for recovering ECR images during outages.
Wrapping it up
With the above Pipeline ready and deployed, we can use other Bitbucket features to improve it. Features like merge checks, branch permissions, and deployment targets can make deployments smoother. We can also tighten the IAM permissions to ensure it has access to only the resources it needs.
A custom Bitbucket Pipe can also abstract away much boilerplate code. Using Pipes, we can use standards and best practices across all ECR deployments.
I hope you enjoyed this tutorial. Thanks, and happy coding :)
Resources

Help me fuel up so I can keep typing typing typing...
&emoji=☕&slug=ayushsharma&button_colour=FFDD00&font_colour=000000&font_family=Cookie&outline_colour=000000&coffee_colour=ffffff)